
This guide will help you learn how to enable and manage Whitelist on your Hytale Server
Click here to order your Hytale server with Citadel Servers today!
Running a Hytale server often means balancing openness with security. While it’s great to welcome new players, sometimes you’ll want tighter control over who can join. That’s where the whitelist feature comes in. A whitelist is a simple but powerful tool that restricts server access to approved players only. By enabling it, you ensure that only trusted individuals, those you’ve specifically added, can connect. This helps prevent griefing and unauthorized access, and keeps your community safe and enjoyable. With the whitelist enabled and properly managed, you gain full control over your server’s membership, creating a secure environment where players can focus on building, exploring, and having fun together.
Setting Up a Whitelist on your Hytale
1. Log in to your Game Control Panel and navigate to your service.
2. Navigate to the Web-Console Tab.

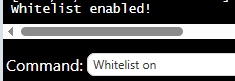
3. In the Web-Console tab, run the following command:
whitelist on
The whitelist can be disabled at any time by entering the following command:
whitelist off
When the whitelist is enabled, only approved players on the list and server admins will be able to join.
Managing the Whitelist
Once the whitelist is enabled, you can easily add or remove players at any time to manage server access.
Adding a player from the whitelist:
whitelist add <playername>
Removing a player from the whitelist:
whitelist remove <playername>
Changes take effect instantly, meaning players will gain or lose access the moment the command is executed.

Enabling a whitelist is one of the simplest and most effective ways to secure your Hytale server, giving you complete control over who can join and ensuring a safe, trusted community.
Did the above information not work for you?
Please click here to contact our support via a ticket.
