![]()
This guide will show you how to add admins on your Vein Server.
Click here to order your Vein server with Citadel Servers today!
Running a successful Vein server requires more than just great gameplay it also depends on effective administration. Whether you're expanding your team or delegating responsibilities, adding trusted admins is essential for maintaining order, enforcing rules, and supporting your player community. This guide will walk you through the process of adding admins to your Vein server. You'll learn where to locate the necessary configuration files, how to assign admin privileges, and best practices for managing access securely. Whether you're setting up your first admin or building a full moderation team, this step-by-step approach will help you get it done quickly and correctly.
Adding Admins on your Vein Server
1. Log in to your Game Control Panel and navigate to your service.
2. Before making any modifications, stop the server from running by clicking the Stop button.

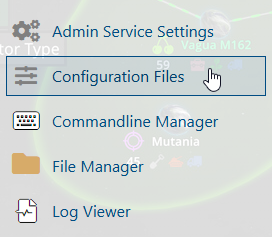
3. Go to the Configuration Files.
4. On the Configuration Files, look for Vein\Saved\Config\WindowsServer\Game.ini file and click the Text Editor.

5. On the Text Editor, To add admins to your Vein server, locate the configuration section labeled /Script/Vein.VeinGameSession within your server files. Inside this section, look for the lines:
If these lines do not exist, you’ll need to add them manually. Once present, insert the SteamID64 values of the players you wish to grant admin privileges. Multiple IDs should be separated by commas, like so:
6. After editing, click the Save button to apply the changes.
![]()
Did the above information not work for you?
Please click here to contact our support via a ticket.
